Front Drum To Disc Brake Conversion Guide For 1965-1972 Ford Trucks
Reserved. This document may not be copied or published without prior written
consent of the author.
repair, it is recommended that you do not attempt this procedure. This
procedure involves disassembly of the braking system and much of the front
suspension. If you are at all unfamiliar with the parts and tools listed
below, or any of the content of these instructions, it is probably best
that you do not attempt this conversion! The author assumes no liability
for the contents of this document or its accuracy. Follow these procedures
at your own risk.
Credits: I wish to thank Drew Beatty, Dave Resch,
Dennis K. Austin and Chris Thompson for editorial and technical advice.
You can meet them on our discussion groups.
Having said all that… lets get on with it.
Motivation
I wrote this FAQ for two reasons; a) many list members ask about this
conversion and b) several list members asked me to write this guide.
Why Disc Brakes?
For most braking applications there is little or no difference in the
stopping ability of drums verses discs. However, drums do have several
drawbacks. First, driving through a large puddle of water renders the braking
system nearly ineffective until the brake shoes “squeegee” the
water out. I’ve learned this from experience! Second, repeated braking
or braking with high loads can quickly overheat drum brakes resulting in
“fade.” In many automotive applications (including this one)
discs offer more stopping power.
1965-1966 trucks are slightly different and you’ll need these instructions
provided by list member Dennis K. Austin.
Parts You’ll Need
- Disc brake spindles – spindles from any year 73-79 F100/F150-250. should
work just fine. If possible make sure the donor truck’s rotors are in serviceable
condition. Why buy new rotors if you don’t need to? Its also a good idea
to replace the wheel bearings during this conversion. I do not give directions
for this as most Haynes/Chilton guides covers this. Make sure the banjo
bolts (the bolts with a hole in them that secure the brake line to the
calipers) are included with the spindles. - Proportioning valve – the split-off valve from your old braking system
won’t work. Without the proportioning valve your front brakes will drag
severely. This valve should come from the same donor truck as the spindles.
If you are pulling the parts yourself: get the valve bracket and brake warning electrical
plug. Some 67s do not have a brake warning light – mine doesn’t. The disc
brake connector is a 2 contact plug. You just need 4″ to 5″ of the
wire end to splice into your original harness. - King pins – you’ll need to use king pins from the year truck you
own. The current king pins in your truck should be the right size.
If you want your truck to steer “like new” get a new king pin
kit and bushing kit. These run about $50-$70. New rubber brake
lines – don’t use the ones from the donor. Brake lines run about $10 each.
There’s a good chance the donor lines are ruined. Many times junk yards
use a torch to heat up the king pins for easier removal, destroying the lines in the process. - Steel bracket – just a flat piece of 6″ x1″ metal with a
bolt hole on each end. You will use this to fabricate a proportioning valve
bracket. A bracket needs to be made as the mounting location differs between
67-72 and 73-79 trucks. - Steel brake lines (3/16″)- Get a few and also get couplers lines
so you can tie into the old lines. You can always return extra parts but
its a pain to find out you don’t have enough line 4 hours into a job. - Brake line bending and cutting kit – about $20, if that much. Make
sure you get a kit with a flaring tool and make sure it is a double flaring
tool. A single flare can leak. - Large bottle (2 quart) of brake fluid.
- New brake pads – these are cheap, why not start off with new pads?
Probably a good idea to get new anti-rattle kits also, as they usually
don’t come with the pads. - New (rebuilt) calipers – about $10 bucks each. In my case, it was cheaper
to buy the calipers than it was to buy a rebuild kit. And I got $15 each
for the cores so I actually got paid for them! I used single piston calipers
on my truck (67 F100), depending on your needs you may want dual piston
calipers. - Hard plastic scraper – use this to clean the frame before running the
steel lines. Having clean frame rails will make the job a lot easier (not
to mention cleaner). Or go to a self-serve car wash that has engine cleaning
capabilities. The grunge level of your truck will determine which method
you use. - Large hammer and drift – use a big hammer, such as a small sledge hammer.
- Propane or acetylene torch – this is optional but will make king pin
removal much easier. - Good set of jack stands – don’t trust your life with concrete blocks!
One good whack with the hammer and the truck WILL come down! - 73-79 master cylinder – I’ve heard from sources that you should use
a 1975+ as its bigger but I can’t verify this – they all look the same
to me. - Brake line fasteners – I use the rubber coated type.
- Protractor with arm for measuring brake line angles
With this conversion, I’m assuming you already have power brakes. If
not, you’ll need a power booster from a 73-79. Instructions for changing
over to power brakes are not yet included.
The instructions for this conversion project are divided into four parts:
Part I. Replace the Spindles
Part II. Temporary Field Alignment
Part III. Reconnect the Brake Lines
Part IV. Complete the Installation
Each part includes detailed step-by-step procedures. Be sure to follow
each procedure carefully. Do NOT skip any steps.
Part I. Replace the Spindles
- A few days prior to this conversion, grease the king pins. The fittings
are at the top and bottom of the radius arms (the spindle pivot point).
Use a grease gun to lube these fittings. Be generous in your application
of lube. - Replace the calipers on the spindles before you put them on the truck.
This is the easiest way to do it. Also, make sure you don’t put them on
upside-down! This mistake can be made easily, and the brake lines won’t
reach if you do this (don’t ask me how I know). The bleeder fittings should
be at the highest point of the caliper. Now is the time to replace the
rotors if they need it. - Do one side at a time, no need to put the entire front end up on jack
stands. Put more than one stand under the truck and optionally have a good
hydraulic arm jack (I use a 2 1/4 ton) under the truck. If by some chance
the truck moves and comes off the jacks at least you’ll have the hydraulic
to hold it up — and it has wheels. It would also be a good idea to block
the rear tires. Place the jack stands under the frame and not under the
I-Beams. - Remove the tire and wheel. Remove the rubber brake line from the drum.
- Remove the brake drum then the backing plate with the brake shoes and
hardware attached. This leaves the spindle readily accessible. - At the top and bottom of the radius arms there are grease fittings
– remove them. Half way between them there is a horizontal bolt that holds
the king pin in place – remove it. - After removing these parts you’ll see the king pin. Place the drift
on top of the king pin and give it a hard, solid whack with the hammer.
It may take repeated hits to budge the king pin. Once it starts moving
it gets easier. Sometimes application of heat (acetylene torch )around
the radius arm helps. In many cases the king pins are very hard to knock
out. The only good solution is more muscle or a bigger hammer. In some
cases the king pins come out with virtually no effort, but most people
don’t lube the chassis as often as they should. - If they’re really hard to get out remove the shock absorber and spring
(buy or rent the proper spring removal tool). Disconnect the radius arm
and support the I-beam with an anvil. This makes beating out the king pin
easier. · Once the king pin is out, unbolt the tie-rod end. Pull
the spindle and it will come off. Be careful, its heavy. If you’re going
to replace the king pins now is the time to remove the brass king pin
bushing – not fun. You’ll have to press or knock it out. - Install the new bushing by placing a piece of hard-wood on top of it
and whacking it down until it seats in the king pin hole. Only do this
with nylon bushings. Brass bushings need to be pressed and fitted to the
king pin but they do last longer. If you want longer life, you can take
the spindles to a machine shop and get brass bushings pressed in. Nylon
bushings can be installed by the do-it-yourselfer but they don’t last as
long. - Clean and lube up the bushing area with WD-40. Don’t use chassis lube
at this point. The tolerances are tight and you want a thin lubricant for
easier installation. Once installed you can use chassis lube. - Place the disc spindle on the truck. A wooden cog pushed slightly up
the bottom hole is recommended to keep the spindle still while installing
the king pin. - Install the new king pin by placing a piece of hard wood on top of
it and driving it down. Do NOT hit the king pin directly! Not using the
wood and hitting the king pin can mushroom it making installation nearly
impossible. - Once the king pin is leveled into place, replace the horizontal bolt
which secures the king pin. Place the grease caps back in place. Don’t
attach the rubber hose yet, it will get in the way if installed right now. - Attach the tie rod, bolt it and put a cotter pin on it. In some cases
the tie rod end is not long enough. If this is the case, you’ll have to
grind off about 1/8″ from the top of the spindle tie rod hole. If
you don’t grind off this 1/8″, the tie rod won’t seat fully and you
won’t get a cotter pin on the tie rod. - Replace the wheel.
- Repeat the procedure for the other side.
Part II. Temporary Field Alignment
- Before attaching the brake lines we need to align the steering. Its
better to do this now instead of after you’ve finished the brakes. The
temptation to “test drive” it before its aligned will be too
great. Misalignment will be severe! It will be extremely difficult to hold
the truck on the road, and if you do manage it you’ll probably tear the
tire off the wheel. I’m not joking about this – the alignment WILL be that
BAD as the tie rod points on the newer spindles are not in the same place.
Toe in will be about 3 inches. - These alignment instructions are very brief and not precise. An alignment
guide with thorough details may appear in the future. I’m just giving enough
instructions so you can get it to a shop to have it properly aligned. This
is a field alignment only. I strongly recommend that you take it to an
alignment shop for a complete alignment. - First, place the front end on jack stands just barely off the ground.
- Measure the distance from the inside of one tire to the frame on both
the front and back of the tire. - Turn the wheel until both measurements are equal. Write this number
down. - Have someone hold the steering wheel in place. You’ll see the adjustment
area in between the tie rods. This is a sleeve between the near the left
frame rail. - Turn the adjustment in or out (it may be hard to get it started) until
both tires measure equal distances from the frame. Double check the first
side frequently throughout the adjustment. - Both sides should have the same measurement (roughly) that you wrote
down earlier.
Part III. Reconnect the Brake Lines/Adding new lines
- Hook up the rubber brake lines to the caliper.
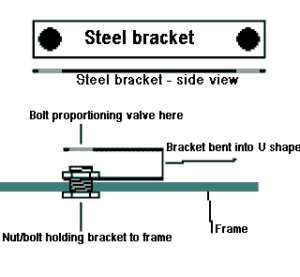
- Take the steel bracket mentioned in the parts section and bend it in
a vise so it looks like a ‘U’. - Crawl under the truck and remove the splitter valve. It’s located on
the left frame rail in front of the transmission mount crossbar. About
1 foot behind the tranny crossbar there is a hole in the frame. - Bolt the bracket to the frame.
- Bolt the portioning valve to the bracket.
- Cut the existing brake lines where they went into the old splitter
valve and flare the ends. - Attach new steel brake lines to the old lines using couplers. Run these
new lines to the proportioning valve. - Cut the rear brake lines about a foot behind the valve. Optionally,
you can run completely new lines instead of tying into the old lines. This
is a lot of work as bending the lines properly for the steering box area
can be difficult. I chose to replace all the brake lines on my truck; the
clean lines and stock look was worth the effort. - Attach new steel lines to the old and to the proportioning valve.
- Remove the old master cylinder. The new one should bolt in place. Do
not tighten it down yet. After the entire job is through you need to adjust
the push rod that fits into the master cylinder so the brake peddle has
the proper travel before engaging. I can’t tell you what this travel distance
is – it just “feels right.” Don’t forget to “bench bleed”
the master cylinder. I used a hand pump with the MC filled with fluid to
do this. There are other ways. This step is optional but it makes bleeding
the system much easier. - Now run steel lines from the proportioning valve to the lines coming from the master
cylinder. Don’t cross them over to the wrong part of the master cylinder!
Remember to use a protractor with a sliding arm to measure the angles for
the new lines. Also, use the bending tool to bend the lines. Bending them
by hand will kink them or cause micro fractures which can lead to premature
failure. Also, use the tool that came with the cutting kit to create a
good ‘v’ flare on the ends of the new lines before attaching them. - Now that everything is all hooked up, use the brake line fasteners
to fasten the new lines to each other and to the frame (where you can find
a mount point.) As a helpful illustration, I’ve included a diagram of the
proportioning valve. There’s a good chance they handed it to you at the
junk-yard and you don’t know which outlet goes where.

- If you have a dash warning light you should cut off the old brake warning
light plug and splice in the new one. It has two wires coming off from
the plug. One wire is spliced to the original in the harness; the other
wire should be insulated and tied out of the way.
Part IV. Complete the Installation
- Lube the king pins. The fittings are at the top and bottom of the radius
arms (the spindle pivot point). Use a grease gun to lube these fittings. - Bleed the system. This will take a while as there is a lot of air!!!!
After you’ve bled it, bleed it again just to make sure. - Fasten down the master cylinder start the truck and see much peddle
travel you have before the brakes engage. If it doesn’t “feel right”,
loosen the master cylinder and readjust the push rod. - Test drive it. Be very careful! There’s always a chance you have NO
brakes!. You should have a firm pedal and no brake drag. A soft peddle
that gets harder with pumping indicates there is still air in the system.
Brake dragging could be a defective proportioning valve (I doubt it) or
that the push rod that goes into the master cylinder needs to be adjusted.
Special Notes For 1965-1966 Modifications
Things to buy;
SPINDLES, ROTORS, & CALIPERS
Spindles from a junk yard. Take the spindles from a ’74 F-100/150 truck.
Try to get a set of spindles with good rotors and calipers. The rust
that may be on the rotors will clean up with emory cloth. The calipers
you will trade in for new ones as instructed on the main page.
The junk yard may cut the old king pins with a torch. So, the donor king
pins can not be used for anything and you do not need them anyway. If
they do use a torch make sure that they did not cut into the king pin
holes in the spindles. Check before you buy them. Stick you finger in
there and feel around. If they have major cuts in there from the torch
then the spindles are useless. If there is a little scoring then the
plastic sleeves, from the new king pin kit, will work okay if you clean
this up with emory cloth. I have been told that if there is any scoring
or cutting into these holes the brass bushing can not be used.
STEERING LINKAGE
The ’65 steering linkage will probably be worn out. Its over 30 years
old. A good way to tell is to see if your linkage “ball joints” flop
about. You will see this when you pull the old spindles off. If they
lay over to one side and you can easily push them to the opposite side
then they are shot. Replace it with a new steering linkage kit for a ’74
model. That way you do not have to shave 1/8″ off the spindles as
mentioned on the main page. The linkage kit will fit perfectly to the
spindles and to the ’65 steering arm. A kit comes complete with crown
nuts, cotter pins, etc. This kit comes in three boxes.
KING PINS
The new king pins should be for a ’65 model truck. That is MOOG part
#8496N. These will line up perfectly with the new spindles and the
I-Beams. This kit comes complete with everything new. You will not
need anything from the old king pins. Follow the instructions on the
main page.
Extra notes;
Once the old king pins are out… clean out the I-Beam tube where the
king pin goes through with emory cloth. You must have your new king pins
when you do this step. Wrap the emory cloth into a tube and insert it
into the I-Beam. Put a finger in each end and pull it back and forth.
Occasionally check the hole by wiping it out with a rag and sighting
down through it for rough spots or rust.
WARNING! Don’t over do it! Try fitting a new king pin into the hole
every so often. Once you can pound a new king pin through the I-Beam
with your fist and pull it through by hand you are done. If your king
pin drops through onto the ground without any effort on your part you’ve
over done it. A honing tool may take out too much material and cause
this hole to be too big.
You may find that it will take more than one weekend to do this because
of your available time. Once you have got the spindles mounted and you
are cleaning up for the day, you may find that tying garbage bags over
your spindles will stop any new surface rust caused by rain. This has
been a real problem this year. Too much rain and too cold.
HEALTH WARNING! New spindles with rotors attached are heavy and awkward
to handle during assembly! Though you may big and strong enough to lift
them keep in mind that you will have to hold onto the assembly with one
hand while inserting the spacer bearing, washers, and king pin, while
trying to keep it all aligned on the smallest end of the I-Beam. It is
recommended that you get help. KEEP YOUR FEET OUT FROM UNDER THE
I_BEAM!!! Should you let go of a spindle and your foot is under there
you are guaranteed a trip to the emergency room and you may lose a toe
or two! Think about it while sitting in front of the I-Beam before you
start.